Drawing skulls has long fascinated artists for its rich symbolism and anatomical complexity. Skulls are a staple in various art forms—from Renaissance still-lifes to modern tattoo art—because they capture both the essence of life and the inevitability of death. Mastering how to draw a skull is not only a technical feat but also a creative expression.
In this article, we will explore the techniques, tips, and tools needed to successfully draw a skull. Whether you’re a beginner or an advanced artist, you will find valuable information to improve your craft.
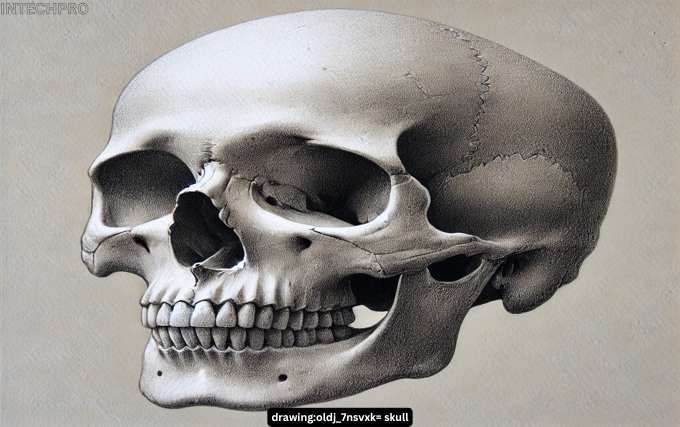
Understanding the Anatomy of a Skull
Before diving into the actual drawing process, it’s crucial to understand the anatomy of the skull. A human skull consists of 22 bones that form the framework of the head, and its shape can vary slightly between individuals. However, the key components of a skull—such as the cranium, mandible, eye sockets, nasal cavity, and teeth—remain the same.
Key Parts of the Skull
- Cranium: The cranium is the largest part of the skull, consisting of the bones that protect the brain.
- Mandible: This is the lower jaw, the only part of the skull that moves. It plays a big role in facial structure.
- Eye sockets (Orbits): These are the hollow spaces where the eyes sit. Their round shapes can be tricky to draw in three-dimensional form.
- Nasal Cavity: This is the opening in the skull where the nose would sit. It’s usually depicted as a triangular or diamond-shaped hole in drawings.
- Teeth: The teeth are a prominent feature in skull drawings, and their detail can make or break the realism of the sketch.
Understanding these elements will allow you to create a more accurate and detailed drawing of a skull.
Tools You’ll Need
While the choice of tools is subjective and can vary based on style, some basic supplies are recommended to get started:
- Graphite pencils: Pencils ranging from HB (hard) to 6B (soft) will help you achieve a range of light and dark tones.
- Eraser: Both a kneaded eraser and a standard eraser are great for correcting mistakes and adding highlights.
- Blending stump or cotton swabs: These tools are essential for shading and softening harsh lines.
- Paper: Choose a smooth, medium-thick paper that can handle both fine lines and shading.
Step-by-Step Guide to Drawing a Skull
Step 1: Start with Basic Shapes
The first step in drawing a skull is to simplify its shape into basic forms. This makes it easier to map out proportions and the overall structure.
- Draw an Oval: Start by sketching an oval for the cranium. Don’t worry about perfection; this is just a guideline.
- Add a Horizontal and Vertical Line: Divide the oval into four sections. The vertical line will represent the symmetry of the skull, while the horizontal line will guide the placement of the eyes.
- Map the Jawline: The lower portion of the skull is the jaw. Extend lines downward from the sides of the oval, tapering inwards to create the general shape of the mandible.
Step 2: Define the Eye Sockets and Nose Cavity
With the basic shape of the skull established, you can now focus on its key features.
- Eye Sockets: Just above the horizontal guideline, draw two large, slightly slanted circles or ovals for the eye sockets.
- Nasal Cavity: Draw a small upside-down heart or a triangular shape below the center of the oval to represent the nasal cavity.
Step 3: Outline the Teeth and Jaw
The teeth and jawline are crucial for giving your skull character and detail. Keep in mind that the teeth are not flat—they follow the curved structure of the jaw.
- Teeth: Sketch small rectangular shapes in the lower part of the face, starting from the center and working outwards. The teeth should become smaller and less detailed as they move towards the back of the jaw.
- Jawline: Make sure the jaw is properly aligned with the upper part of the skull, following the oval shape you initially created.
Step 4: Add Details to the Cranium
The cranium may seem simple at first glance, but adding subtle details can bring your skull drawing to life.
- Forehead: Add slight shading or lines to the upper portion of the skull to represent the curve of the forehead.
- Temporal Region: This is the side of the skull where the temples would be. Add some definition here by shading or lightly sketching in a curved line.
- Cranial Sutures: These are the lines where different bones of the skull meet. Including these in your drawing can enhance its realism.
Step 5: Shading and Rendering
Shading is essential in giving your skull drawing depth and a sense of realism.
- Light Source: First, decide where the light is coming from. The parts of the skull closest to the light source should remain the lightest, while the areas furthest away should be in shadow.
- Shading the Eye Sockets and Nasal Cavity: These areas should be the darkest because they are recessed. Gradually build up darker tones in the eye sockets, the nasal cavity, and the gaps between the teeth.
- Blending: Use a blending stump or cotton swab to soften the shadows. This will give the skull a smooth, rounded appearance and remove any harsh lines.
- Highlights: Use your eraser to add highlights on the forehead, the cheekbones, and along the jawline.
Step 6: Final Touches
Now that the shading and details are in place, take a step back and assess your work. Look for any areas that could use more contrast or detail.
- Fine-Tuning the Teeth: Adding tiny lines or cracks between the teeth can give them a more realistic, aged look.
- Texture: If you’re aiming for a more weathered skull, you can add small cracks or imperfections in the surface of the bone.
Common Mistakes and How to Avoid Them
1. Proportions Are Off
One of the most common mistakes in drawing skulls is getting the proportions wrong. To avoid this, always start with guidelines and take time to measure the placement of key features like the eyes, nose, and jaw.
2. Teeth Look Unrealistic
Many beginners either make the teeth too large or draw them too uniformly. In reality, the teeth vary in size and should follow the natural curve of the jaw.
3. Over-Shading
While shading is important for realism, too much can flatten the drawing. Make sure you’re blending smoothly and that your light source is consistent throughout the drawing.
Creative Variations of Skull Drawing
Once you’ve mastered drawing a realistic skull, you can begin to experiment with more creative variations. Skulls can be highly stylized depending on the artistic approach and purpose.
1. Sugar Skulls (Calavera)
Inspired by Mexico’s Day of the Dead, sugar skulls are colorful and intricately decorated. These skulls often feature bright colors, floral designs, and patterns that add a festive, lively aspect to an otherwise morbid subject.
2. Anatomical Skulls
If you’re interested in medical or anatomical illustrations, focusing on precision and accuracy will be key. Use reference images of real human skulls to get every detail correct.
3. Skull Tattoos
Tattoo designs often feature skulls combined with roses, snakes, or other symbols. Skulls in tattoo art may range from hyper-realistic to highly stylized, and mastering this style requires a good balance of creativity and technical skill.
4. Fantasy Skulls
Fantasy skulls can take on supernatural or otherworldly elements, such as horns, glowing eyes, or intricate carvings. This is where you can let your imagination run wild, as there are no anatomical rules to follow.
Conclusion
Drawing a skull is a rewarding artistic challenge that enhances your skills in anatomy, shading, and creative expression. By understanding the structure of the skull, practicing basic shapes, and refining your shading techniques, you can create highly detailed and realistic skull drawings. Once you’ve mastered the basics, don’t hesitate to explore more imaginative and creative versions.
Whether you are creating an anatomical study, a tattoo design, or a stylized skull for an art piece, this guide provides the foundational knowledge and techniques to bring your skull drawings to life. So grab your pencils, find a good reference image, and start sketching!